At the end of November 2017, Oli Ward gave a Git workshop which was hosted at DevelopMe, the web development training company he runs. It was a great opportunity for those not very familiar or confident with Git to get an in-depth look into the fundamental commands and workflows. More seasoned users could still pick up some previously unknown details, and contributed some knowledge as well.
I just become aware that we have come full circle with this, as the first evening workshop we ever did was on Git as well. There were also two inbetween, making it the technology we’ve covered most! The workshops all differed a lot from each other, which goes to show what a multi-faceted topic it is. From basic commands, you can go to workflows, the internals of Git, lifecycles of files to a debate about the ability to “change history”.
This will be my last entry on this blog. We have not decided when we will organise the next workshop, and I will anyway stop writing about them here - we might find a different way to document them.
In any case, it has been an amazing four years so far, and I cannot express how grateful I am to everybody who gave up their time to make these workshops happen, most of all those who created and delivered them!
On 24 September 2017 we organised a day of JavaScript workshops, like we did before in 2014 and 2015 (and Bristol JS in 2013).
It was a really nice day where everybody got chatting, the venue near TempleStation was ideal, and we had four great talks. You can find the links to slides and materials below.
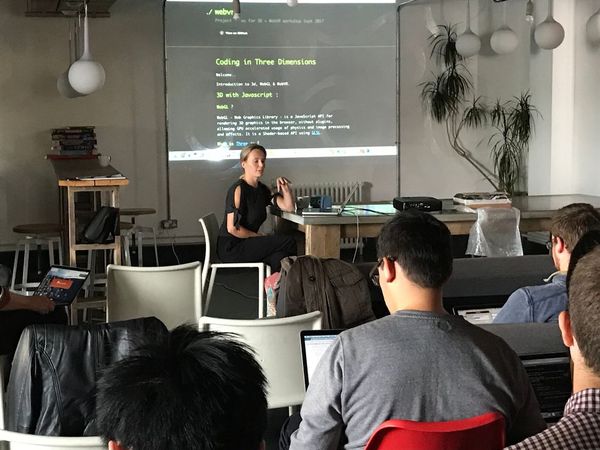
Liv Franzen - Coding in three dimensions - an introduction to WebVR
Instructions with link to repo: https://tailless.github.io/webvr/
For VR examples, you need an Android Phone with Google VR Services app installed ( requires Android OS version 6+ Marshmallow and gyroscope )
We also had a panel where four developers (Liv Franzen, Bridget McErlean, David Moody and Simon Capet) answered questions from the audience.
Many thanks to all the speakers. We are also grateful to our sponsors, OnCorps, who made this event possible.
For this workshop we were happy to have Dave Liddament from Bristol PHP training help us out with a great introduction to terminal commands and writing Bash scripts.
The introduction on the Meetup page describes the workshop quite well:
"If your interactions on the terminal window are little more then running basic commands like cd, ls, mkdir, etc then you’re missing out on a powerful tool. Even a basic understanding of bash can give you a massive productivity boost. Script all those boring tasks you need to do, automate backups, make deployment of new versions of an application a 1 line command.
This workshop will introduce you to the basics of bash and writing scripts. You’ll learn about powerful commands like find, grep, sed, rsync. We’ll write scripts to for tasks to deploy applications, run backups and create release notes from git commit logs."
This year we have focused a lot on our JavaScript group, while the hack night has also gained traction. We organised two workshops as well, though. Both took place at the Momentum Offices and were each attended by about 20 people. Here’s the summaries and links:
CSS layout
In March, Carl Hughes gave a workshop on CSS layouts. It’s exciting times: For the first times there are CSS specifications that are explicitly intended for creating layouts. Flexbox is already widely implemented in major browsers, and Grid Layout should be available in spring 2017 (currently behind a flag).
Carl started with a presentation about the history of CSS layouts: From tables, to floats, table-layout and inline-blocks to Flexbox and Grid layout. Which ones have you used in your web development career? - You can find the slides here http://slides.com/codekipple/css-layout#/
Carl focused on what is probably the best method to create a grid layout, if you don’t want to use a framework or Flexbox: A standalone and nestable grid system using inline-block elements. He created exercises for using this grid system, as well as some for Flexbox and Grid layout. Check them out!
The other workshop was run by myself and David Moody. The aim of the workshop was to introduce Git concepts like merging, rebasing and working with remotes.
On the 14th of November 2015, CodeHub organised another JavaScript workshop, after one that took place a year ago, and one from 2013 which had been organised by BristolJS. This is a summary of the talks.
Test-driven development of Express applications using Mocha and Chai (or: How I learned to go fast)
In the first presentation, Bridget McErlean talked about what TDD is, best practices, and how writing tests can make you faster; and give you a sense of achievement, too - Check out the slides + speaker notes). Then she demonstrated how to write tests on an example Express app, using Mocha and Chai. The example is up on GitHub. After cloning the repository and running npm install, you can check out different tags. For each new test, there is one tag where the test fails, and one where it succeeds (git tag will show you the tags available). Also, check out the nyan branch, then run npm test ;)
Getting started with Ionic framework
Denis Sellu walked us through the setup of an Ionic app. Ionic is a framework built on top of Cordova and Angular. It has a range of pre-installed elements and directives, which let you create mobile apps with relative ease. Denis demonstrated how you can scaffold a sample app with one Ionic command, then serve the app for viewing in the browser (which is different from emulating the app of course). An alternative approach for scaffolding is using a tool like Yeoman. On the interface side, Ionic seems to use a lot of CSS3 techniques, like flexbox grids and CSS tranisitions for animation. Denis showed how you can create app-like interfaces with a few lines of code. To get started with Ionic, check out Denis’s blog post: http://cookieshq.co.uk/posts/getting-started-with-ionic/. There will be more posts to follow.
Hardware hacking with Littlebits
From mobile, we moved to hardware. Danielle Vass is an Android Developer, but also teaches children and students to code, mostly using JavaScript; in combination with SVG, or electronics. For this workshop she used the CloudBit from the LittleBits electronic components library. The Cloudbits can connect to a web APi. As a first simple exercise we controlled the bits from the web: by pressing a button in the browser, we made the Cloudbit light up. Another example was getting wheather data through YQL(Yahoo query language) and post them to the Cloudbits. Danielle wrote a gist with instructions. And here are the slides for her presentation.
Transpiling in 2015 - Not as scary as you think
The remaining two talks concerned ES6 (or ES2015). ES6 offers a whole range of new syntax and constructs that add to, and change the language considerably. Nico Burns showed how you can use ES6 today, despite lack of full browser support. The most important ingredient is a transpiler like babel, which compiles ES6 into ES5. Nico showed a whole setup for development, using node, gulp and browserify, and of course babel. He went through some examples of ES5 code which he rewrote in ES6 to show the benefits. He also showed how you can use source maps to help with debugging the compiled code. Check out the setup and examples by cloning Nico’s git repository. After running npm install, look at the files in the src/ directory. When you run gulp build, these will be transformed into the files that you find in the dist/ directory.
ES6
While the previous talk was about how to transform ES6, the following and last one was about the features of the language. Jack Franklin had gone “meta” and built a whole app in ES6 which allows users to work through interactive examples of ES6. In this app, we could modify some code so as to make previously failing tests pass. You started by signing in with your name. Using the Pusher API, Jack could receive feedback (which was displayed on a ‘secret page’) on who was working on which section and whether they failed or passed. Jack used jspm which allows you to use any module format for your dependencies, and compiles ES6 to ES5. The web application is available here: http://bristol-js-es6.surge.sh and the corresponding repo here: https://github.com/jackfranklin/interactive-es6.
Many thanks to all the speakers. We are also grateful to our sponsors, Momentum and Moltin, who made this event possible.
This was a great opportunity to learn about open-source CMS SilverStripe directly from the company behind it (more precisely, Dan Hensby and Joel Edwards from SilverStripe UK in London). Dan delivered an in-depth workshop on how to get started with SilverStripe and build a website on top of it. One powerful feature of SilverStripe is that you can define relations between data objects with a few lines of code. As an example, we were able to quickly code up a staff page and assign properties to each member of staff and have those display in different views.
Some current PHP and development best practices were covered at the same time. These were the steps that the workshop went through:
Getting a development environment up and running with Vagrant and Composer
See how quick and easy it is to create a custom data schema and get a CMS interface for editing content
Start showing the data that is managed in the CMS in front-end templates
Learn how to implement forms on the frontend site and storing the submissions for CMS users to access
We kicked off the autumn season with an event in Bath. Gicela Morales and Danielle Vass talked about their experiences with teaching kids to code. Gicela runs after school clubs with Coding Bug and Danielle has run many coding sessions with kids, and also university students, in Bath.
There was quite a lively discussion after the presentations. How can we serve kids and in particular girls better and give them the opportunity to learn and enjoy programming? While programming is now part of the curriculum for primary schools, there’s at least one case we heard of where the option to do a GCSE in computer science has been removed (and this was a girls’ school!). In general, providing adequate education in secondary schools might currently be the bigger challenge than in primary schools.
One very interesting suggestion - based on positive experience - was getting older girls to guide younger ones as a good way to involve them in coding activities.
There was some interest in a workshop on how to teach kids to code, so we might organise one in the new year.
In this presentation and workshop, Phil Pearce showed how to use JSON-LD to provide structured information about a website’s content and improve SEO. He gave many practical examples that enabled people to get started with adding JSON-LD to a site right away.
JSON-LD (Linked data based on the JSON format) allows you to use structured data on your website without having to embed it in your markup. While it has officially been recommended by schema.org since 2013, support by Google has significantly grown from the start of 2015.
Some examples of how to use JSON-LD:
https://developers.google.com/structured-data/testing-tool/?url=http%253A%252F%252Fsearch4phil.com%252F_testing_script%252F____json_ld%252Fjson-ld-test.html
Following on from the Vagrant workshop three weeks earlier, Richard Wall introduced Docker, software that allows you to package, deploy, and run applications with the help of containers. Docker is sometimes pitched against Vagrant when in fact they can be used together (see this StackOverflow post with comments from the authors of Vagrant and Docker)
This was another hands-on workshop and gave a great introduction into what you can do with Docker. You can go through the tutorial on your own, cloning the git repo that Richard put together (see link below). The slides give a brief and clear introduction to the different types of virtualisation that tools like Vagrant, Puppet and Chef provide, and on the other hand Docker.
There used to be an interactive tutorial teaching you the most common Docker commands, but it seems to have disappeared off the Internet! But this self-paced training might be a good replacement: https://training.docker.com/self-paced-training
Our first workshop of the year was on Vagrant and was run by Carl Hughes. Carl first gave a presentation about how Vagrant fits into the evolution of a developer’s environment - from using Ftp for moving files to the server to virtual machines, Vagrant and provisioning tools. These tools allow you to automatically replicate development environments and make setting up and collaborating on a project much smoother.
In the presentation, Carl also introduced the task for this workshop, which was to get a Vagrant up and running that consisted of Ubuntu with Apache, PHP and MySQL installed. The Vagrant also had shared folders with the host OS onto which we had cloned the CodeHub website repository. We imported a dummy database (identical to the real CodeHub database except for user information), and could that way make a local version of the Codehub concrete5 website run on our machines.
The workshop was very hands-on and there were a few steps where you could get stuck, but it was good that way, because that is of course what often happens in development. It was a great way to get started. I will also use the Vagrant that I have on my machine now, when I work on the CodeHub website again, and if somebody else wanted to contribute they can use it too. - Just need to get round to it, but as I managed to update these pages now, I am hopeful!
After July 2014 we did not have any regular morning meetups anymore. The summer holidays came, then the one-day JavaScript workshop. We did have a “Show and Tell” meetup in October though, and then repeated that one December evening, both times with quite low numbers. (Kudos to Adam Butler who gave both his own and Andrew Nesbitt's talk at the December meetup).
As we had the evening workshops and hack nights we were wondering whether to drop the morning meetups at the Big Chill. The numbers had been relatively low, and it was sometimes difficult to find people to give small workshops.
Then Gicela and I had an idea. Why not use the morning meetups to learn JavaScript together, something we had started once, before we became a Meetup group.
We scheduled the first session for February 17. We had 16 people attending on that day, which was way more than we had ever had for a morning Meetup. It was a very friendly, communicative and diverse group of people. After a round of introductions I talked people through using the browser console, and then running some scripts in there involving JavaScript’s simple data types. I think this worked well to make sure everybody could start at least from that base level. It was great seeing that some discussions started around some of the concepts.
We’ve had a second session in the meantime, which was about functions, objects and arrays. We discussed some of the differences of defining functions in various ways, and different options of creating objects. We also heard a presentation on a personal project and an introduction to git and GitHub. We also started on a little single-page app which everybody could contribute to by adding a JSON file.
All in all this meetup seems to be off to a good start. Also, Eloquent JavaScript is a brilliant book, not only about JavaScript, but about programming in general. If all we achieve is working through that by keeping each other motivated, that would already be a lot. But it would be a nice bonus if we actually managed to build something together. That is challenging, as I know from last year, but I want to at least give it a try.
As an additional treat, Richard Davey, the creator of Phaser, was at the event to answer questions about Phaser. He talked about the day to day development work, creating games for the BBC, the challenges of testing, the beginning of Phaser and its upcoming features and products built on it (Cbbc's Technobabble Game Maker and a new version of Scratch).
If you are interested in updates to Phaser you can read about its development on Richard Davey’s blog Photonstorm.com
The first ‘Bristol Hack Night’ took place on October 21st 2014. The hack nights were the idea of, and are run by, Jeff Schomay. Jeff is a JavaScript developer and writer from America who moved to Bristol at the start of 2014. Jeff had previously lived in L.A., where there were several JavaScript hack nights taking place every week, mostly at offices after work hours. He was missing that here, so decided to set one up on his own. He suggested it through our Meetup pages, so I met up with him and as it fit in well with CodeHub we started planning the first hack night, as well as the HTML5 games workshop.
At the hack nights, everybody can just bring anything they want to work on. There is pizza and drinks. At the beginning everybody says what they are planning to work on, so people with shared interests can compare notes or help each other out. The first meetup had 23 participants if I remember right, then there was a stretch with sometimes just over 10 people, but after a while it really picked up and now it is more like 20 people per meetup.
I have not always been able to write much code, some of these hack nights turned more into “chat nights” for me, but there's at least one side project, an advent calender built with Node/Express and ReactJS, that I owe to the hack nights, where people gave me some crucial pointers.
At the time of writing, the hack nights have been running for over 6 months, and are about to relocate from their initial home at the Engine Shed to the offices of Bluespeck Financial/Momentum Financial Technology - who sponsor the hack nights.
I am looking forward to the next half year, when the hack nights will actually take place in daylight!
On the 13th of September, CodeHub hosted a day-long JavaScript event at the YHA in Bristol, which consisted of 7 roughly hour-long workshops by 7 different speakers. With this, we took over from BristolJS who had organised a (two-day) event of this format a year earlier.
What follows, is a brief description of the talks, and links to tutorials where available. For some of these it will be necessary to have NodeJS and MongoDB installed, if you would like to work through them. You can find a collection of linked resources at the bottom of this post.
No REST for the whippet
The very first talk, by Tom Spencer, was in fact about using Mongoose (which lets you define schemas for Mongo collections where you need them), Node and Express to build a REST API. Tom started with a presentation about the principles of building an API. This was followed by a hands-on example in which code had to be modified in order to create a working API that manipulates entries about dogs. In the tutorial, you can check your progress by running tests, as well as peek at the right solution. Find out how to do this in Tom’s blog post.
Development Tools
Next up was Tessa Alexander who talked about Development Tools, focusing on the commandline. But before that she asked everybody in the audience about their background as a developer which was a great way of getting to know each other. - My favourite command is probably the “!!” (which you can use to repeat your last statement, so you can write “sudo !!” if you couldn’t execute a command because of lacking permissions). Another great one is “cd -“ to get back to your previous directory. You can find Tessa’s slides online.
Making maps with JS, GoogleMaps and MapBox
In the third workshop, James Barlow demonstrated how to create Maps and add dynamic elements to them. He also pointed out different mapping services like Open StreetMap and Mapbox. You can find his tutorial with demos here: https://github.com/jmbarlow/maps-training
Refactoring
Jack Franklin had kindly come over from London to be part of our workshop. He explained what ‘code smells’ make refactoring JavaScript necessary or worthwhile. He then took us through several different examples, both pure javascript and jquery. https://github.com/jackfranklin/codehubjs. Also, check out his book The Refactoring Tales which will be published in 2015.
Using the MEAN stack
While there are some tools that let you install the compleate ‘MEAN stack’ (Mongo, Express, Angular and Node) — for example mean.io or this yeoman generator —, Denis Sellu demonstrated how beneficial it is to understand the different parts of an application. At his company Missionly, they do not use a preformatted solution. The workshop helped me understand many things that I’d not been aware of just using a scaffolding tool, and made me want to always make an effort to understand what the individual parts in a stack do.
Introduction to Functional Programming
Nico Burns, who like Jack Franklin had already presented at the previous year’s JavaScript workshop, gave a workshop on Functional programming. In JavaScript, functions can be assigned to variables, passed as arguments to other functions, and returned from functions just like numeric values. This makes it possible to for example apply functions to every item in an array, or to use a function to dynamically create a function from other functions. You can check out the examples in theses files. Nico also recommended some articles and videos, links to which you can find below in the references.
State Machines for complex UIs
A state machine is a way of representing a system in terms of ‘states’ and ‘transitions’. The machine can only be in one state at a time. The transitions between states are also well-defined, and triggered by actions. Marcus Kielly showed us how you can program state machines that control for example a traffic light, or the interface of a little game. You can download the slides and examples.
This one-day workshop was very well received and a lot of the group went over to the Arnolfini afterwards and continued discussing things (sure not all Javascript though ;)) I think the material was useful to people. I can of course only speak for myself, but as time passes after this event I keep coming across things that I remember from this workshop and that give me a head start on understanding something. I am grateful to everybody who helped make it possible, my CodeHub colleagues, the sponsors, Google Developers and oDesk, and most of all the brilliant speakers. Also, to BristolJS, who gave great advice and helped recruit speakers.
What is the MEAN Stack? According to Google it is a full stack javascript environment consisting of MongoDb, Express, AngularJS and NodeJS, but what does that really mean? Essentially that every element of the stack is written in the same language - The Data storage, the data transformation, the data manipulation - everything is all done in Javascript.
There is actually a package which does all that in one go - Mean.io - but that’s a very opinionated framework which has been very carefully considered and well supported. You may want that, or you may want to take parts of it - I’ll leave that as an exercise for the user. Below is the old manual way of doing it to get everything hooked up.
As a windows user it’s less well documented getting up and running on this stack so here I’ll go through the tools to get you going. You will need to install the following from these locations. I prefer to use the 32 bit versions even though I’m on a 64 bit machine as I had random errors on the 64 bit.
You need to ensure that as all tools (node, git etc) are installed that the path is encorporated. This can be done as part of the installation process - GIT and Node installs will give you the option, but if you have already got these installed you can also include the paths manually.
Eg - if git is installed at C:\Program Files (x86)\Git\bin;C:\Program Files (x86)\Git\cmd
Open Windows Environment Variables/Path Window
Right-Click on My Computer
Click Advanced System Settings link from the left side column
Click Environment Variables in the bottom of the window
Then under System Variables look for the path variable and click edit
Add the pwd to git’s bin and cmd at the end of the string like this:
Do the same for Node and Mongo - make a note of the installation paths when you install these
Typically tools usually also require you to run Grunt and Bower. These can be installed by running the following from the command prompt. When you run a command prompt ensure you run is as an Administrator (in an elevated role). See here for instructions on how to do this - http://technet.microsoft.com/en-us/library/cc947813(v=ws.10).aspx
Our second evening workshop was on Testing. Tom Buckley-Houston gave an introduction into the philosophy and the principles behind testing in software development, as well as giving many live coding examples. I really liked the analogy, that testing is, in a way, as “necessary” as friends are.
You can run most of the examples in the browser in jsFiddle. But even if you don’t want to try out the examples, the Readmes are in this case really worth reading! They will give you a lot of background knowledge on testing.
Yesterday we had our last CodeHub morning meetup till after the summer. I did a little workshop on Angular JS, a front-end MVC framework; mainly on the fundamentals and how to get started. - I had been wondering whether to do this at all because of a lack of expertise in this field, but I guess that is the spirit of CodeHub - and OpenTechSchool - that you can teach others something you have just learned yourself. It helps of course if there are people in the group who have worked with the technology and can add to what you are saying, and that was the case yesterday.
Rather than talking much about Angular JS itself, this is an account of some things I came across and found helpful.
In my workshop (Repos here: Angular1, Angular2), I basically built on two tutorials that I found particularly useful and suitable for passing on to others in a hands-on session*. There is Dan Wahlin’s video “AngularJS Fundamentals in 60-ish Minutes” which I had first heard about from Maff Rigby at the JS workshop last year.
The other one I came across after a - generally very helpful - discussion with Duncan Woods, who told me I should look for a tutorial that includes unit testing. It is a two-part tutorial written by Raoni Boa Ventura, and takes you through building a relatively simple app on top of the Angular seed project while explainig all the steps. It includes using an API as the data source and - testing!
The interactive tutorial that CodeSchool built with Google is also quite good, from a beginner’s perspective, although I think you get a better overview with the one mentioned previously.
In terms of video tutorials, I can’t miss the egghead.io videos of course.
We had an interesting discussion about scaffolding tools (is that a term?) at the meetup. One thing I have noticed recently, when I have - so far for training purposes, but soon for 'real' I hope - used various package management and build tools to bootstrap an app or website: It is immensely practical just typing in a few “npm install” or “bower install” - or just “yo angular” - and in no time have a little sample project ready that you can start from. For PHP there is composer now, but I wonder if you can ever start a PHP project with the same ease..
Two boilerplate tools I remember being mentioned: mean.io (MongoDB, Express, Angular, Node), and sailsjs.org for realtime communication. But there are so many more of course. In fact, too many, probably! I also came across an interesting post the other day that argued that we should stop writing (and eventually using?) frameworks at all..
But even if at some point I arrived at the conclusion to not use a framework, I think it is good to have at least had a go at them. At the superficial level that I have progressed to now, I have to say Angular looks very good, the way it is structured makes sense to me and I found it easier to get started with it than Backbone (I didn’t try very hard with that, though). But I know that once you get into the nitty-gritty it will be a lot harder, and weaknesses of the framework more apparent. I would in any case also like to try out KnockoutJS at some point.
To round this off, I'm just going to mention two more tools. I downloaded a trial version of the WebStorm editor, and really liked how you can integrate it with Chrome to have live update in the browser. In fact I liked it in general, and am wondering whether to buy a license. Talking of Chrome, there is the Batarang extension that lets you visualise scope. dependencies and performance of your app.
I hope we can have a follow-up session on Angular at some point. And I hope that I’d soon be able to contribute to such a session, though I’d prefer it to be run by somebody else! In the meantime, thanks to those who turned up, you were lovely.
* The session did not turn out to be as hands-on as planned though, as we faced a serious of technical glitches:
- The miniport adapter to connect my laptop to screen had inexplicably broken on my way in
- The wifi was not working** and for some reason we could not get any sufficient tethering either
- Okay, not really technical: I had not managed to push up my files to GitHub on time, nor managed when I was at the venue; yay for memory stick keyrings.. The git repositories are up now though!
** After moving downstairs to the bar, we got Wifi working on *one* of the laptops which we then connected to the screen
On 17 June of this year we had our first bigger evening workshop. I think nothing could have been more fitting than to have Git and GitHub as the topic, and Andrew Nesbitt, who is a developer at GitHub, as the speaker. We use Git and GitHub a lot for CodeHub (I am publishing this on GitHub pages), and knowing about them is crucial if you want to collaborate on code.
The first thing we did in the workshop was to set up a GitHub repository for each us to use for a GitHub pages website. This way any changes could directly be seen in the browser. Andrew used a special GitHub account set up for his rabbit Bertie. We then cloned the repo to the local machine and manipulated it with basic git commands. (Add and commit files, look up previous commits etc.)
Something I did not know was that there are GitHub clients for Windows and Mac. These make it a lot easier to interact with GitHub, especially for Windows users. There is no need to generate and install keys anymore. The client also comes with Git and a command-line shell included.
As a next step, we forked our neighbour’s repository, made some changes to it, and then issued a pull request. In turn we had to accept the pull request from our neighbour. I had two that created a conflict which took me a bit to sort out, but I managed. GitHub also helps with telling you what commands to use.
We then looked at branching and merging. Andrew went through some examples that we could follow along on the command line.
Andrew also answered individual questions of attendees during the workshop, of which there were quite a few. We also had a Q&A session at the end and looked at some interesting repositories. For example, there are whole programming languages developed on GitHub. And there is a tool that works in your terminal, where you ‘collaborate’ with a robot that creates a merge conflict for you. (Git-It, see below)
I am glad how this workshop went, and we had some very positive feedback. I am also very grateful to GitHub that they took over the costs for the room that I had to hastily rearrange after I learned we could not use the original venue. - And thank you Andrew again for the great workshop!
At our June meetup, Duncan took us from first steps in using D3.js for creating svg elements and simple charts through to creating a force layout diagram, which involves some more elaborate code. It was a great way to get started with D3.
The example below uses data taken from the Mood Panda app and visualises the number of interactions between members.
Duncan’s tutorial is available on the CodeHub GitHub repository: github.com/CodeHubOrg/d3-workshop. It uses Node to set up a local server and express site. Then you uncomment and manipulate the d3.js code in the files bit by bit, and view the results in the browser.
With increasing browser support, SVG (Scalable Vector Graphics) is finally becoming a valid option for creating images that can scale without loss across multiple viewport sizes.
There are a number of areas where SVG can be useful, for example:
Icons that can be styled with css
Generated graphs and other diagrams like pie charts, columns charts
Animated images
In this workshop we will look at the anatomy of svg images and see an example of how they can be manipulated.
1. Anatomy of an SVG element
In its most basic form the svg element only requires a link to the svg namespace and the version number. You can also add other namespaces. An additional namespace that makes sense to include is the xlink namespace.
Shapes in an svg element are being drawn on a grid that spans from the top left to bottom right. A y coordinate of 200 means that the point is drawn 200 units (in most cases pixels) from the top down.
The most powerful shape element is <path>. It can be used to draw all the other elements. It has an attribute D, which contains a series of commands and parameters to draw a line. For example M 10 20 means “move to point 10 20”, C stands for Cubic Bezier curve, and Q for quadratic one. Z is used for closing a shape.
For example <path d="M10 10 H 90 V 90 H 10 Z" fill="transparent" stroke="black"/>
We will now start creating an SVG image, which we can later animate. We will define a shape, group various elements, use them in different places in the document, and manipulate them, too.
The <defs> element is used to define and element for later reuse. This could also be a gradient or pattern.
The <g> element groups elements together. By assigning an id to the group element, it can be treated as a whole.
Let’s start creating a pinwheel:
First, our svg element with a title inside. It’s all markup!
We are using a / element for the pinwheel. The id is assigned to the group inside the <defs> element though. Then we start drawing the stalk as a rectangle.
We are drawing one ‘petal’ of the pinwheel as two path shapes and put them in a group called “p”:
<svgxmlns="http://www.w3.org/2000/svg"xmlns:xlink="http://www.w3.org/1999/xlink"><title>Pinwheel</title><defs><gid="pinwheel"><rectx="300"y="250"height="320"width="16"fill="#28b"/><gid="p"><pathid="wing1"d="M 200 250 L 200 150 Q 200 50 300 50 L 300 250 Z"fill="#fc0"/><pathid="wing2"d="M 200 150 L 200 250 300 250 C 240 210 220 190 200 150 Z"fill="#ff3"/></g></g></defs></svg>
To reuse the petal, we use the <use> element. The element that you want to reference is included as a link. Make sure that the href attribute is prefixed by the xlink namespace. The namespace also needs to be declared in the root element!
We also need to rotate the three remaining petals at the same time. For that we use the 'transform' attribute. Finally, we wrap the whole wheel in a group withe the id “wheel”.
<svgxmlns="http://www.w3.org/2000/svg"xmlns:xlink="http://www.w3.org/1999/xlink"><title>Pinwheel</title><defs><gid="pinwheel"><rectx="300"y="250"height="320"width="16"fill="#28b"/><gid="wheel"><gid="p"><pathid="wing1"d="M 200 250 L 200 150 Q 200 50 300 50 L 300 250 Z"fill="#fc0"/><pathid="wing2"d="M 200 150 L 200 250 300 250 C 240 210 220 190 200 150 Z"fill="#ff3"/></g><usexlink:href="#p"transform="rotate(90 300 250)"/><usexlink:href="#p"transform="rotate(180 300 250)"/><usexlink:href="#p"transform="rotate(270 300 250)"/></g></g></defs></svg>
Please note: Up to here, it worked to have the svg element inline in the web page. To make the rotation visible, this is not sufficient anymore. The element needs to be embedded with an <embed> tag or linked to within an iframe.
Let’s complete our example and make the petals rotate (and change colour - but hey, that’s done with Javascript!) as well as add a rotating dashed circle in the middle.
<svgxmlns="http://www.w3.org/2000/svg"xmlns:xlink="http://www.w3.org/1999/xlink"><title>Pinwheel</title><script><![CDATA[
function changeColor(){
var w1=document.getElementById("wing1")
w1.setAttributeNS(null,"fill","#faa")
var w2=document.getElementById("wing2")
w2.setAttributeNS(null,"fill","#933")
var A=document.getElementById("A")
A.beginElement()
var t=1000
window.setTimeout("A.endElement()",t)
}
]]></script><defs><gid="pinwheel"><rectx="300"y="250"height="320"width="16"fill="#28b"/><gid="wheel"><gid="p"><pathid="wing1"d="M 200 250 L 200 150 Q 200 50 300 50 L 300 250 Z"fill="#fc0"/><pathid="wing2"d="M 200 150 L 200 250 300 250 C 240 210 220 190 200 150 Z"fill="#ff3"/></g><usexlink:href="#p"transform="rotate(90 300 250)"/><usexlink:href="#p"transform="rotate(180 300 250)"/><usexlink:href="#p"transform="rotate(270 300 250)"/><animateTransformid="A"attributeName="transform"type="rotate"repeatCount="2"onend="changeColor()"dur="2s"from="0 300 250"to="360 300 250"/></g><circlecx="300"cy="250"r="8"fill="#543"/><circlecx="300"cy="250"r="16"fill="none"stroke="#543"stroke-width="8"stroke-dasharray="3,2"><animateattributeName="stroke-dashoffset"repeatCount="indefinite"values="1;16"dur="1s"/></circle></g></defs><usexlink:href="#pinwheel"transform="scale(0.3,0.3) translate(-20,-40)"/></svg>
Much of the power of SVG lies in how it can be scripted and manipulated by Javascript. Libraries like Raphael.svg, snap.svg and d3.js are available. That would be material for another tutorial!
At our April meet-up Rob took us through installing and building a small site with the static site generator DocPad. It is built on node an the express framework and has an impressive list of features. It can also be extended via plugins, which enables you to build the site with the tools you are already used to.
We also looked at CSS Animations with keyframe rules and transforms, and created a flying buiscuit!
At this month's meetup Duncan gave a workshop about Node and Grunt, which touched on many techniques in JavaScript development along the way (e.g. Modularisation, Package Management, JSHint, Testing).
Some facts about Node I didn't know: It has the V8 engine integrated, you can use it to create web and desktop applications, and dependencies in Node are managed with the CommonJs library.
I found interesting to learn about dependency management in Node.
Each module has its own submodules. Even if there are common dependencies, they will be downloaded for each module separately. You might even get different versions. This way conflicts are avoided, also the files are ususally not very big.
Use package managers to handle all your external libraries
Use CommonJS to structure your javascript
Use JSHint to catch common javascript errors
Use Jasmine and Karma to unit test your code
Use Grunt to automate your build
We did not manage to completely work through the whole workshop, and decided to finish it at home. Duncan offered to answer any questions we might have at the next meetup.
Also at the next meetup, Rob will talk about animation with CSS3, HTML5 Canvas and three.js.
Our first meetup this year was stymied a bit by the bad weather, but seven of us were there in the end and we had some good discussions — not only about the intended topics, but more besides.
As promised, I am putting up some documentation which for now mainly consists of an example of working with file permissions. If you’re like me, this is probably something you often kind of ‘muddled through’ without knowing all the details. I have certainly benefited from looking more closely at it.
To get an overview about file permissions and ownership in your current directory, use the ls command with the -l flag (and -a for including dot files):
$ ls-al#for detailed information about files in current directory
drwxrwxr-x 4 katja katja 4096 Feb 11 00:06 .
drwxrwxr-x 18 katja katja 4096 Feb 11 00:04 ..
-rw-r----- 1 katja www-data 13 Feb 11 11:24 index.html
drwxr-x--- 4 katja www-data 4096 Feb 11 00:27 modules
drwxrwx--- 2 www-data katja 4096 Feb 11 00:05 upload
You can also check a single file by using the command like this: ls -l [filename] :
Each file is owned by a user(u) and a group user(g). A third category are all the other users(o).
CHMOD - Change permissions
The first column shows the set of permissions for the three types of users.
There are many good resources on how the symbols map to the three user types, and how they can be translated into numbers, for example here:
http://linuxcommand.org/lts0070.php
For changing permissions, you can then use the chmod command with symbols, for example:
$ chmod ugo+rwx file
or using the numeric interpretation:
$ chmod 777 file
About users and groups
Each user belongs to a group. When a new user is created, as default option a group with the user’s name will be created and the user assigned to it.
In this example, we will work with three users: root, www-data (the server user - or Apache user), and the login user
Some more information (IDs for the user and all the user’s groups) :
$ id
uid=1000(katja)gid=1000(katja)groups=1000(katja),4(adm),20(dialout),24(cdrom),46(plugdev),116(lpadmin),118(admin),124(sambashare)
A list of all users on the system can be found in the file /etc/passwd, a list of all groups in /etc/group. Caveat: On a Mac things seem to be organised somewhat differently.
CHOWN - Change ownership
Syntax:
chown [OPTION]… [OWNER][:[GROUP]] FILE…
chown [OPTION]… –reference=RFILE FILE…
We will see this in action below.
Note: For changing permissions, it is sufficient to be the file owner, for changing ownership you always need root access.
A practical example - Increase security by restricting access
Note: This is assuming you are on a system that has an Apache server set up, which means there is a www-data user and group. If you don’t have that, just use a user and corresponding group of your choosing.
In your home directory - or even a local website directory if you have one for testing -, create a folder called ‘mycms’, then cd into it
  $ mkdir mycms
  $ cd mycms
Inside our cms we create an index file, a modules directory with two modules, and an upload directory.
  $ touch index.html
  $ mkdir modules upload
  $ cd modules
  $ mkdir module1 module2
  $ cd ../

  # check with ls -al
What do we really need? The crucial thing is that the Apache user (www-data) needs to:
- read index.html
- read and traverse modules folders
- read and write to upload folder only
How can we do that?
- Keep ownership and write access with the login user
- Change the group to that of the Apache user, and assign it only read access
- The ‘other’ group will then not need any access at all for files being served
So we change group ownership recursively for the modules. Then we can change the permissions of ‘others’ to 0 (—), that of the Apache user to 5 (r-x)
Next, we change the group ownership for index.html. We don’t need executing rights here, because it’s a file, so we change permissions to 640 (- rw- r– —)
  $ sudo chown :www-data index.html
  $ sudo chmod 640 index.html

  # Check with ls -al
Uploads is a special case, because www-data needs to write here as well. We could still have www-data as group owner, and give write permissions, but can just as well have www-data as the user owner of the directory, and have a group of users as the group owner. The ‘others’ group still does not need any rights.
Question: What would be displayed if you have this running on a server, and you change the group of index.html back to your login user, but leave the permissions?
Setting permissions recursively
The above example was of course a very simplified version of a real CMS. You will often have many subdirectories with files and directories in there. In the Wordpress Codex, there is a good recipe for setting permissions for both recursively.
Two days to go to the next meetup, the first after we’ve set up a group on Meetup.com (and these pages!). While 11 is not such a big number, it is more people participating than at previous meetings. Also, the range of backgrounds is more diverse than before.
This has prompted me to write down some thoughts, perhaps as a starting point to develop some guidelines. I believe there will need to be some structure to make it all work.
Session Format
Each session will run from 10am to 2pm and we’ve agreed to have one or more workshops per session. The workshops are unlikely to take the full 3 or 4 hours and, once they are over, people are free to stay on to work on something, or just to chat - or both!
The workshop themselves could be of many different types: Working through a script with help from a coach or coaches, Coding Dojo, a talk explaining concepts with a challenge afterwards, a “surgery” with questions from the audience..
Possible Topics
Anything to do with (web) development and programming really. For example: Git and GitHub, Linux/Server admin, Javascript Frameworks, Web Development Tools, Python + Django, Open Data, GIS/mapping etc.
Skill levels?
A certain level of coding/programming skill will be necessary to get something out of these sessions, but everybody is welcome to attend. Moreover, everybody whatever their skill or experience level is, should feel encouraged to share their knowledge, and give a presentation.
Documentation
We are planning to write some documentation for every session. Ideally this documentation would come from the people presenting, but it should not be a prerequisite for somebody doing a workshop.
Working together on a project?
Our original aim was to work together on a project, and learn new techniques that way. But for various reasons this turned out to be quite challenging:
a, It took a relatively long (but enjoyable) brain-storming session to come up with a project
b, In the next phase, we found that we had different idea how to approach things. It can be difficult making decisions as a team, it’s easier if you have a manager (or a client!)
c, Simple time constraints. Clients waiting and looming deadlines meant that not everybody could devote enough time to keep working on it.
Saying that, we have not given up on this idea, and I’d be interested to hear from people who have experience with something similar, for example from working on an Open Source project.
If you have jekyll installed, you can run a copy of this site locally.
  $ cd codehuborg.github.io/
  $ jekyll serve --watch
You can then view the site in your browser at http://localhost:4000.
Create a new file in the _posts directory, for example by copying the one for this post. You need to name the file in the YYYY-MM-DD-title.md format. In the file, you can set the title and categories of the posts at the top. Keep the layout set to 'post'.
For writing the post, you can use Markdown or HTML. Also, Github Pages uses Pygments, and it is enabled for this site. That means when you want to highlight code, you can use a syntax like the following, taking PHP as an example.
<?php$html='This statement is ';//I love ternary operators
$html.=($number_of_people>30)?'right':'wrong';echo$html;?>
Once you have written your post, push it to the repository on GitHub. - If you have run the site locally, don't forget to list the _site directory in your .gitignore file.
Some useful resources if you are not familiar with Git and GitHub:

